Guide
Requirements
Before using Checkout, you will need an easypay payment account.
An example app that demonstrates the steps described in this guide is available at https://github.com/Easypay/checkout-demo .
Creating a checkout session
To create a Checkout session, you are required to send a server-to-server POST request to the /checkout endpoint. The created session will have an expiration time of 30 minutes at most, after which the users won't be able to pay that specific Checkout anymore.
Like all API requests, this request is authenticated as described in Authentication, which means you must include the AccountId and ApiKey headers.
An example payload is:
{
  "type": ["single"],
  "payment": {
    "methods": ["cc", "mb", "mbw", "dd", "vi", "uf", "sc"],
    "type": "sale",
    "capture": {
      "descriptive": "Purchase in MyStore"
    },
    "currency": "EUR",
    "expiration_time": null
  },
  "order": {
    "items": [
      {
        "description": "T-shirt",
        "quantity": 1,
        "key": "t-shirt",
        "value": 12.5
      },
      {
        "description": "Gloves",
        "quantity": 1,
        "key": "gloves",
        "value": 7
      }
    ],
    "key": "order-123",
    "value": 19.5
  }
}
You can check all the possible parameters in the Checkout reference.
The service will return something like:
{
  "id": "57cc19e9-f393-4cfa-9516-8807763b5096",
  "session": "8zoaBOC0Mj5Mg_YAbdRCqYGI66Zc2DttAWeyVcedzhuT3r2IE8aS7l7H-sQOyppgawIv-wO48H_oKDHMzvMf1TeIJwo3Xu7HO7Tmj7y1iblt8t9JlEzyNdf5HurTvCeszC8PdRS4mbaPBCMCQ7g4xkG0qUuOEhiee5OB49MJJQ-Mo9vEnC_R4hzRBi-HSIMviTNDcCm5NiMnn__nWZxpfAmh6pYUg_eznqTGNbheYLu7ku_mBn7HvAdJQcgsmk6eeD-Z9S8SsK-ONHpbJQz1LNZsUkIIiWpNxPMrzD5Je0r2veawzAaIQmCeN8hYncHDfl5YZ7PP28MFVtEjMGOxsOsqxL4wmDOLPO5s6aWMq7Dxns-OGgf0r7dmaka4Y2mXovLVtNxsGgsNbBav8K86f5DceCDmPKBzYh-X5i1nx07LuqYKoJmA8NfyVP5tb-R3Y9dtwbPzcHc_AyQVKlsM0HtW3JXAdqoIBfsDgUqwASeuqQHEyIITKlcRvDIzWFaxTgXmmJauj6et7mo1GEM4L1gDkA1IXOd3n4HU2GvfPw==",
  "config": null
}
This return object is referred to as a Checkout manifest, and will be needed in the steps below.
Integrating in your page
Script tag
Include the easypay Checkout SDK in your page:
<script src="https://cdn.easypay.pt/checkout/2.4.0/"></script>
Prepare an empty element in your page where you'd like the Checkout form to be and give it the easypay-checkout id:
<div id="easypay-checkout"></div>
Make sure to trigger the server-to-server call described above and get the contents of the manifest:
const manifest = await yourFunctionToGetTheManifest()
Then, use the globally available easypayCheckout variable to initialize the SDK and display the form:
easypayCheckout.startCheckout(manifest)
And the Checkout should be running smoothly.
Testing
To test your implementation without actually transferring funds, you should:
- Create the Checkout session using the testing API endpoint:
api.test.easypay.pt - Set the
testingproperty of the SDK totrue
easypayCheckout.startCheckout(manifest, {
  display: 'popup',
  testing: true,
})
Remember to remove the testing property when switching to the api.prod.easypay.pt endpoint, otherwise Checkout will be unable to find the created Checkout sessions.
NPM import
Instead of directly including the JavaScript library from the CDN, you can import it as an NPM module:
npm install --save @easypaypt/checkout-sdk
And use it like any other importable dependency:
import { startCheckout } from '@easypaypt/checkout-sdk'

startCheckout(manifest)
All the other steps are the same as for the CDN.
Customizing element id
If you'd like to have the Checkout form displayed in an element with another id, for instance:
<div id="checkout-form"></div>
You can pass the id in the options parameter of the Checkout initialization:
startCheckout(manifest, {
  id: 'checkout-form',
})
Removing Checkout contents
When starting a Checkout form, you can store the return value to later manage it (particularly by removing it from the page at a later date).
const checkoutInstance = startCheckout(manifest)
When you no longer wish to display the Checkout contents, call the unmount() method on the return object:
checkoutInstance.unmount()
Reacting to successful payment interactions
Even before the Checkout process is completed (by the user pressing the End button or closing the popup), the Checkout SDK is able to notify you of a successful payment interaction.
This doesn't necessarily mean that the funds were transferred, but that no more user interaction with the Checkout is needed.
For instance, for a Credit Card payment, this means that the user successfully authorized the operation, and for Multibanco payments this means the user has requested the entity and reference values to pay later.
function mySuccessHandler(checkoutSuccessInfo) {
  // There was a successful payment interaction
  // You can react to details in checkoutSuccessInfo
}

const checkoutInstance = startCheckout(manifest, {
  onSuccess: mySuccessHandler,
})
Your callback function can receive a parameter with additional details about the outcome of the payment process. The full reference of the details is available on the reference page.
Reacting to Checkout UI close
It will often be useful to know when users finish the Checkout process, so you can hide the Checkout contents and display a thank you message. The SDK includes a callback parameter that you can pass to get notified when the Checkout process is closed. In inline mode, this always means that the user finished a payment interaction, but in popup mode the user can choose to close the Checkout popup without finishing a payment interaction.
let successfulPaymentInteraction = false

function mySuccessHandler(checkoutSuccessInfo) {
  successfulPaymentInteraction = true
}

function myCloseHandler() {
  if (successfulPaymentInteraction) {
    checkoutInstance.unmount()
    document.write('Your order was received. Thank you.')
  }
}

const checkoutInstance = startCheckout(manifest, {
  onSuccess: mySuccessHandler,
  onClose: myCloseHandler,
})
Saving frequent payment information
Processing a frequent payment means you have to save tokenized payment details to later use them to actually transfer funds.
To create a frequent payment Checkout session, your initial POST request to /checkout will have to include the type property set to ['frequent'].
After the user selects a payment method and fills in their details (if any), the SDK will call the success handler with the result information. It is at this point that you should send the payment.id field to your server.
function saveTokenizedPayment(checkoutSuccessInfo) {
  sendTokenToServer(checkoutSuccessInfo.payment.id)
}

const checkoutInstance = startCheckout(manifest, {
  onSuccess: saveTokenizedPayment,
})
From then on, you can use the payment ID to send server-to-server requests capturing funds.
Each capture is created by sending a POST request to the /capture/<payment id> endpoint. The request must be authenticated with the AccountId and ApiKey headers as usual.
The payload has to include at least the descriptive and value for the capture. Learn more in the service reference.
{
  "descriptive": "Purchase in MyStore",
  "value": 20
}
On success, the service will return something similar to:
{
  "status": "ok",
  "message": ["Your request was successfully created"],
  "id": "c68d8d1a-4c95-4a87-b9b5-031057b3a68e"
}
You can use the resulting capture id to get information about the specific capture by issuing an authenticated GET request to /capture/<capture id>. Learn more in the service reference.
It will reply with the capture details:
{
  "account": {
    "id": "1a398de4-d318-48fc-a9fd-230f863dc0e1"
  },
  "capture_date": "2022-08-02",
  "descriptive": "Purchase in MyStore",
  "force_3ds":false,
  "id": "c68d8d1a-4c95-4a87-b9b5-031057b3a68e",
  "payment_id": "76ab3c32-7883-459f-a0ef-5fe0541e0ec7",
  "payment_type": "frequent",
  "status": "success",
  "transaction_key": "",
  "value": 20
}
Note: for frequent Multibanco Reference payments, no capture request is necessary. It's the customer's responsibility to make new payments to the same reference.
If you wish to be notified each time a payment is successful, follow our Notifications documentation.
Accepting subscriptions
For periodical payments with a set frequency, you can accept subscription payments in Checkout.
To do so, you will need to specify a payment type of ["subscription"].
You will also need to define:
- A
payment.start_time, that determines when the subscription payments start. The start time must be in the future. - A
payment.frequencythat sets the periodicity of the payments (weekly, monthly, etc). Available values are:"1D"(daily)"1W"(weekly)"2W"(biweekly)"1M"(monthly)"2M"(bimonthly)"3M"(trimonthly)"4M"(quadmonthly)"6M"(semiannually)"1Y"(annually)"2Y"(biannually)"3Y"(triannually)
- Either a
payment.expiration_timeor apayment.max_captures, so that the subscription has an end eventually.
Check the reference for additional details and all the available properties.
An example request payload would therefore be:
{
  "type": ["subscription"],
  "payment": {
    "methods": ["cc", "dd"],
    "type": "sale",
    "capture": {
      "descriptive": "Purchase in MyStore"
    },
    "start_time": "2023-01-01 00:00",
    "frequency": "1M",
    "expiration_time": "2030-12-31 23:59"
  },
  "order": {
    "items": [
      {
        "description": "My streaming service",
        "quantity": 1,
        "key": "streaming-service",
        "value": 12.5
      }
    ],
    "key": "order-123",
    "value": 12.5
  }
}
After typing their details, the customer would then see a confirmation dialog for the subscription:
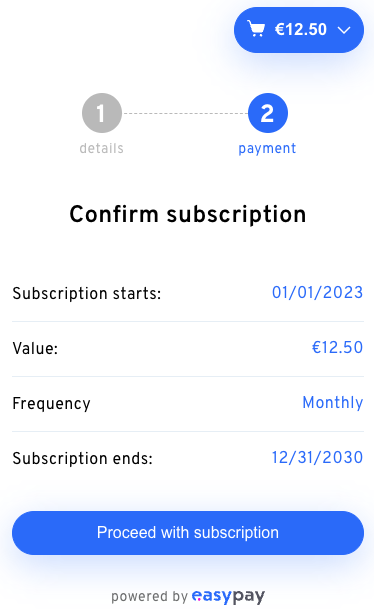
Pressing the proceed button allows to continue on with the payment method selection and the remaining interaction is the same as for single and frequent payments.
Reacting to Checkout errors
The Checkout process is resilient to most forms of errors and allows the customer to retry multiple times with different payment methods until the payment is completed. However, there are cases where the Checkout form is unable to recover on its own, such as an expired Checkout session, an attempt to pay a Checkout that was already paid or a Checkout that was canceled.
You can be notified of such cases by passing the callback parameter onError:
function myErrorHandler(error) {
  checkoutInstance.unmount()
  switch (error.code) {
    case 'checkout-expired':
      // In this case a new Checkout session must be created
      const manifest = await yourFunctionToGetTheManifest()
      checkoutInstance = startCheckout(manifest, {
        onError: myErrorHandler
      })
      break
    case 'already-paid':
      document.write('Your order was already paid. Thank you.')
      break
    case 'checkout-canceled':
      document.write('Your checkout was canceled.')
      break
    default:
      document.write('Unable to process payment, please try again.')
  }
}

const checkoutInstance = startCheckout(manifest, {
  onError: myErrorHandler
})
The list of possible errors is further documented in the reference
How to use popup module
If you want to integrate Checkout and display it in a popup this is what you need to do:
-
Import easypay's Checkout SDK into you project:
-
Add a button with an id to your page:
<button id="checkout">Open Popup</button>
function initEasypayCheckoutSDK(manifest) {
  checkoutInstance = easypayCheckout.startCheckout(manifest, {
    id: 'checkout',
    display: 'popup',
  })
}
Result:

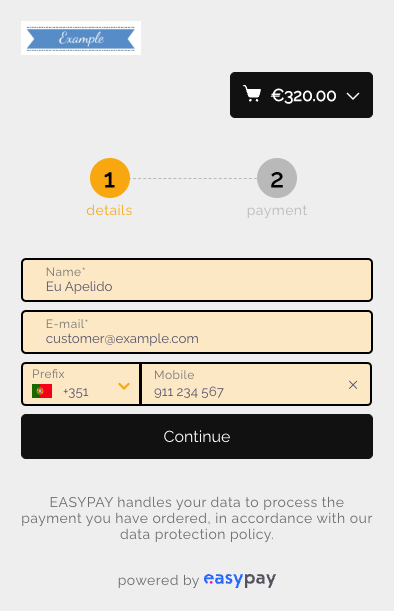
Changing Checkout's appearance
Checkout supports a robust styling API that allows integrators to change its appearance in order to better blend it in their website.
The list of customizations include:
- An optional company logo to display in the header
- The colors used in:
- The background
- Highlights (the more colorful sections of the page, originally blue)
- Buttons
- Input borders and backgrounds
- Whether to use floating labels in the inputs
- Whether to use box-shadow in the buttons
- The font family used to render the text
- The overall text size
With a combination of some of these options, it's possible to change the Checkout entirely, fitting it in your website with ease.
Example:
const checkoutInstance = easypayCheckout.startCheckout(manifest, {
  logoUrl: 'www.example.com/mylogo.png',
  accentColor: 'orange',
  buttonBackgroundColor: '#111',
  buttonBoxShadow: false,
  buttonBorderRadius: 5,
  inputBorderRadius: 5,
  inputBorderColor: '#000',
  inputBackgroundColor: '#ffe7c4',
  backgroundColor: '#eee',
  fontFamily: 'https://fonts.gstatic.com/s/raleway/v28/1Ptxg8zYS_SKggPN4iEgvnHyvveLxVvaorCIPrEVIT9d0c8.woff2',
})
Outcome:
To see every individual option in detail, check the reference.